Dark Chocolate Lava Cakes
Highlighted under: Home-Style Sweets
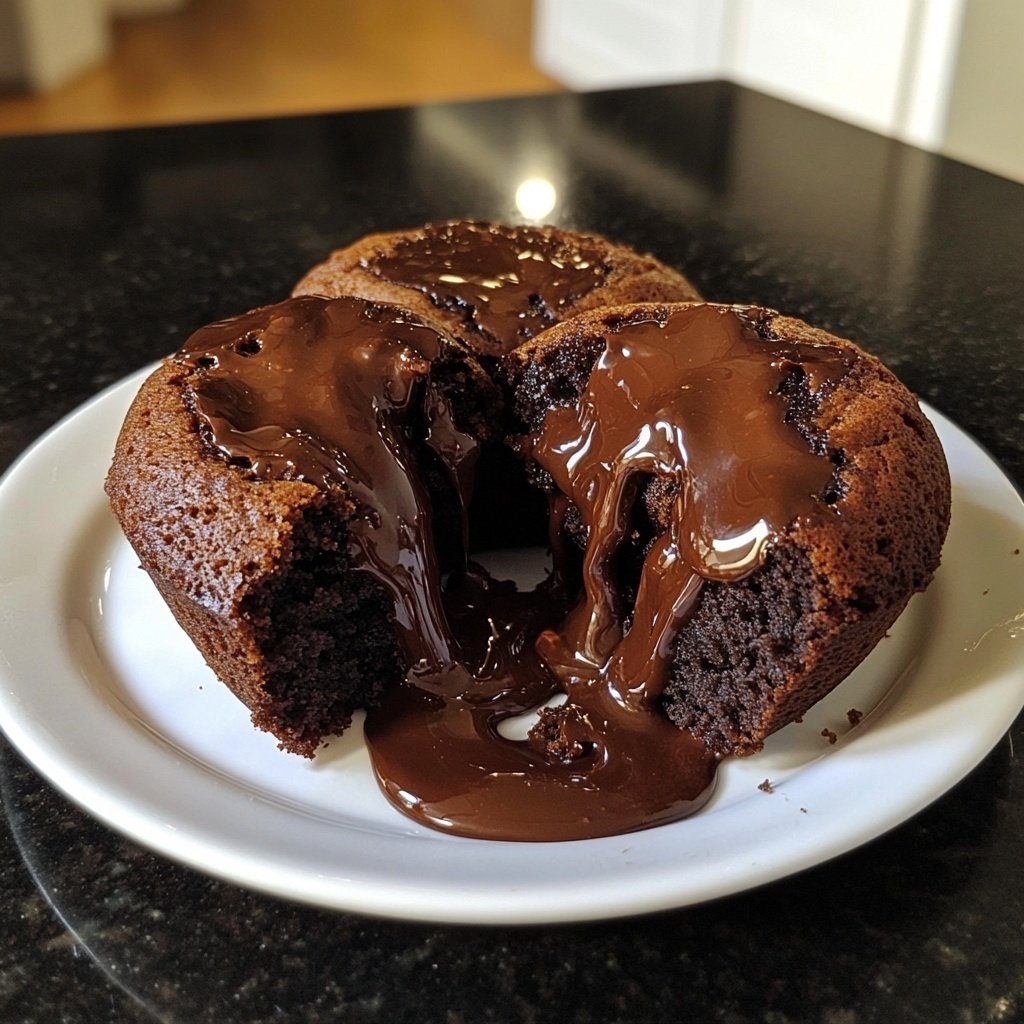
I absolutely love making Dark Chocolate Lava Cakes! These individual desserts are a true expression of my passion for baking, and they never fail to impress. Their rich, molten chocolate center surrounded by a delicate cake is simply divine. I particularly enjoy the thrill of cutting into them to reveal the gooey goodness inside. Whether it's for a special occasion or a sweet treat at the end of a long day, these cakes are easy to whip up and always deliver on flavor and wow-factor.
My first experience making Dark Chocolate Lava Cakes was a revelation. I was attending a dinner party and wanted to bring something decadent to the table. I found a simple recipe that highlighted great quality chocolate, which really made all the difference. The moment everyone cut into their cakes and the chocolate oozed out was simply magical!
What I discovered through trial and error is that the key is in precise baking time. Too little, and the centers don't set; too much, and you lose that gooey goodness. After some practice, I've learned that aiming for 10 minutes in the oven gives the perfect result, every time.
Why You'll Love These Cakes
- Decadent, molten chocolate center that flows with each bite
- Impressively easy to make, yet looks like a gourmet dessert
- Perfect for any occasion—from date night to dinner parties
Mastering the Molten Center
One of the key components of a successful Dark Chocolate Lava Cake is achieving that perfect molten center. To ensure your cakes are not overbaked, set a timer for precisely 10 minutes. Keep an eye on the edges; they should appear firm and set while the centers remain a bit soft with a gentle jiggle when shaken. This specific timing is essential; even a minute difference can turn molten bliss into a fully baked cake.
It’s important to use high-quality dark chocolate, ideally with at least 70% cocoa content. This not only contributes to the rich flavor of the cake but also affects the melting properties. The chocolate should be melted slowly and gently in the microwave to prevent it from seizing. Stirring frequently will help achieve a silky and glossy texture, essential for a smooth batter.
If you find yourself unsure about the proper consistency of the batter while mixing, look for a well-blended and slightly thickened appearance. The final texture should be similar to a smooth brownie batter. If the batter seems too runny, it may indicate that the melted chocolate wasn’t incorporated properly, so take a moment to whisk it more thoroughly.
Tips for Ramekin Preparation
Properly greasing and flouring your ramekins is critical for ensuring your lava cakes release perfectly after baking. I highly recommend using a combination of butter and cocoa powder, as this complements the chocolate flavor. After greasing with butter, tap out excess cocoa powder by flipping the ramekin upside down and gently tapping it to remove any clumps. This extra step will help create a smooth and beautiful finish on your cakes.
Always use ceramic or glass ramekins for baking these cakes, as they distribute heat evenly and ensure consistent baking. If you happen to have different sizes of ramekins, note that smaller ones will require less baking time. To avoid uneven baking, keep to the recommended size or make sure to adjust the timing accordingly, checking for doneness a minute or two before the original time.
Another useful tip is to allow the batter to sit for a few minutes after filling the ramekins. This resting period allows the flour to hydrate fully, leading to a better rise during baking. Just make sure they’re baked immediately after resting to prevent any unwanted lumps in the batter from forming.
Serving Suggestions and Variations
To elevate your Dark Chocolate Lava Cakes, consider pairing them with a scoop of vanilla bean ice cream or a dollop of fragrant whipped cream. The contrast of cold and warm enhances the dessert experience, especially when the molten chocolate center flows out. Fresh berries or a sprinkle of sea salt on top can also add an exciting flavor dimension and visual appeal.
If you'd like to switch things up, feel free to incorporate flavoring into the batter. A teaspoon of espresso powder can intensify the chocolate flavor, while a splash of orange liqueur or vanilla extract can introduce a warm, aromatic note. Just remember that any added liquid may slightly alter the consistency, so you may have to adjust flour quantities to retain the perfect texture.
For those who may not finish all the lava cakes at once, you can store the unbaked batter in the fridge for a few days, ready to be baked fresh whenever you crave them. Just cover the ramekins tightly and take care not to disturb the batter, as this can change the texture. When you’re ready, simply bake straight from the fridge, adding a minute or two to the baking time if needed.
Ingredients
For the Lava Cakes
- 1/2 cup unsalted butter
- 1 cup dark chocolate (at least 70% cocoa)
- 2 large eggs
- 2 large egg yolks
- 1/4 cup granulated sugar
- 2 tablespoons all-purpose flour
- Pinch of salt
- Butter and cocoa powder for ramekins
Instructions
Prepare the Ramekins
Preheat your oven to 450°F (230°C) and thoroughly grease four ramekins with butter, then dust with cocoa powder to coat. This ensures the cakes release easily after baking.
Melt Butter and Chocolate
In a microwave-safe bowl, combine the unsalted butter and dark chocolate. Microwave in 30-second intervals, stirring after each, until completely melted and smooth.
Mix the Batter
In a separate bowl, whisk together the eggs, egg yolks, and granulated sugar until pale and slightly thickened. Gradually mix in the melted chocolate mixture, then gently fold in the flour and a pinch of salt.
Fill Ramekins
Divide the batter evenly among the prepared ramekins, filling them about 3/4 full. Place them on a baking sheet for easier handling.
Bake the Cakes
Bake in the preheated oven for 10 minutes. The edges should be firm, but the center should still be soft and slightly jiggly.
Cool and Serve
Remove from the oven and let the cakes cool for 1-2 minutes. To serve, run a knife around the edges, then invert onto plates. Serve immediately with whipped cream or ice cream if desired.
Pro Tips
- For the best chocolate flavor, use high-quality dark chocolate. You can also add a sprinkle of sea salt on top before serving for an extra flavor boost.
Ingredient Insights
Unsalted butter is recommended in this recipe to give you control over the saltiness of your cakes. It allows you to incorporate precise amounts of salt later in the mix. If you're in a pinch, you can use salted butter, avoiding adding salt to the batter; just remember to adjust it according to your taste preference.
Substituting dark chocolate can also affect the final result. While semi-sweet chocolate can be an alternative, it will yield a sweeter cake. For a dairy-free option, dark dairy-free chocolate or a high-quality cocoa powder can be used—just ensure that your ratios are adjusted properly to maintain the moistness of the cake.
Eggs play a pivotal role in providing structure and richness. When using large eggs, aim for fresh ones, as they bind the ingredients together beautifully. If you prefer an egg-free version, consider using a flax egg as a substitute (one tablespoon of ground flaxseed mixed with two and a half tablespoons of water) to help create a similar texture.
Storage and Reheating
If you have leftover baked lava cakes, store them in an airtight container in the refrigerator for up to three days. When you're ready to enjoy them again, simply reheat in a 350°F (175°C) oven for about 5-7 minutes. This gentle reheating will help revive the molten center without overcooking it.
Unbaked lava cakes can be frozen for up to three months. To freeze, cover the filled ramekins tightly with plastic wrap and then with aluminum foil to prevent freezer burn. When ready to bake, there’s no need to thaw; just increase the baking time by a couple of minutes while keeping an eye on the centers.
For a fun twist, consider making mini lava cakes in muffin tins for bite-sized portions. Just reduce the baking time accordingly, checking for the jiggly center around the 7-8 minute mark. This makes serving easier and offers a delightful little treat for gatherings!
Questions About Recipes
→ Can I make the batter ahead of time?
Yes, you can prepare the batter and refrigerate it in the ramekins for a few hours, just add a couple of extra minutes to the baking time.
→ What if I don't have ramekins?
You can use muffin tins or any oven-safe small dishes. Just adjust the baking time slightly since the size may vary.
→ Can I substitute dark chocolate?
You can use semi-sweet chocolate, but the flavor and texture will differ slightly. Dark chocolate provides the best molten center.
→ How do I know when they're done?
The edges should be firm while the center should look soft and slightly bubbling. If you're uncertain, a toothpick inserted should come out with moist batter.

Dark Chocolate Lava Cakes
Created by: Delilah Spencer
Recipe Type: Home-Style Sweets
Skill Level: Intermediate
Final Quantity: 4 servings
What You'll Need
For the Lava Cakes
- 1/2 cup unsalted butter
- 1 cup dark chocolate (at least 70% cocoa)
- 2 large eggs
- 2 large egg yolks
- 1/4 cup granulated sugar
- 2 tablespoons all-purpose flour
- Pinch of salt
- Butter and cocoa powder for ramekins
How-To Steps
Preheat your oven to 450°F (230°C) and thoroughly grease four ramekins with butter, then dust with cocoa powder to coat. This ensures the cakes release easily after baking.
In a microwave-safe bowl, combine the unsalted butter and dark chocolate. Microwave in 30-second intervals, stirring after each, until completely melted and smooth.
In a separate bowl, whisk together the eggs, egg yolks, and granulated sugar until pale and slightly thickened. Gradually mix in the melted chocolate mixture, then gently fold in the flour and a pinch of salt.
Divide the batter evenly among the prepared ramekins, filling them about 3/4 full. Place them on a baking sheet for easier handling.
Bake in the preheated oven for 10 minutes. The edges should be firm, but the center should still be soft and slightly jiggly.
Remove from the oven and let the cakes cool for 1-2 minutes. To serve, run a knife around the edges, then invert onto plates. Serve immediately with whipped cream or ice cream if desired.
Extra Tips
- For the best chocolate flavor, use high-quality dark chocolate. You can also add a sprinkle of sea salt on top before serving for an extra flavor boost.
Nutritional Breakdown (Per Serving)
- Calories: 380 kcal
- Total Fat: 26g
- Saturated Fat: 15g
- Cholesterol: 195mg
- Sodium: 85mg
- Total Carbohydrates: 32g
- Dietary Fiber: 3g
- Sugars: 24g
- Protein: 6g